
How to create instances
When creating an instance, you must specify the image on which the instance should be based.
Images contain a basic operating system (for example, a Linux distribution) and some LXD-related information. Images for various operating systems are available on the built-in remote image servers. See Images for more information.
If you don’t specify a name for the instance, LXD will automatically generate one. Instance names must be unique within a LXD deployment (also within a cluster). See Instance name requirements for additional requirements.
To create an instance, you can use either the lxc init or the lxc launch command.
The lxc init command only creates the instance, while the lxc launch command creates and starts it.
Enter the following command to create a container:
lxc launch|init <image_server>:<image_name> <instance_name> [flags]
Unless the image is available locally, you must specify the name of the image server and the name of the image (for example, ubuntu:24.04 for the official Ubuntu 24.04 LTS image).
See lxc launch --help or lxc init --help for a full list of flags.
The most common flags are:
--configto specify a configuration option for the new instance--deviceto override device options for a device provided through a profile, or to specify an initial configuration for the root disk device (syntax:--device <device_name>,<device_option>=<value>)--profileto specify a profile to use for the new instance--networkor--storageto make the new instance use a specific network or storage pool--targetto create the instance on a specific cluster member--vmto create a virtual machine instead of a container
Instead of specifying the instance configuration as flags, you can pass it to the command as a YAML file.
For example, to launch a container with the configuration from config.yaml, enter the following command:
lxc launch ubuntu:24.04 ubuntu-config < config.yaml
Tip
Check the contents of an existing instance configuration (lxc config show <instance_name> --expanded) to see the required syntax of the YAML file.
To create an instance, send a POST request to the /1.0/instances endpoint:
lxc query --request POST /1.0/instances --data '{
  "name": "<instance_name>",
  "source": {
    "alias": "<image_alias>",
    "protocol": "simplestreams",
    "server": "<server_URL>",
    "type": "image"
  }
}'
The return value of this query contains an operation ID, which you can use to query the status of the operation:
lxc query --request GET /1.0/operations/<operation_ID>
Use the following query to monitor the state of the instance:
lxc query --request GET /1.0/instances/<instance_name>/state
See POST /1.0/instances and GET /1.0/instances/{name}/state for more information.
The request creates the instance, but does not start it. To start an instance, send a PUT request to change the instance state:
lxc query --request PUT /1.0/instances/<instance_name>/state --data '{"action": "start"}'
See Start an instance for more information.
If you would like to start the instance upon creation, set the start property to true. The following example will create the container, then start it:
lxc query --request POST /1.0/instances --data '{
  "name": "<instance_name>",
  "source": {
    "alias": "<image_alias>",
    "protocol": "simplestreams",
    "server": "<server_URL>",
    "type": "image"
  },
  "start": true
}'
To create an instance, go to the Instances section and click Create instance.
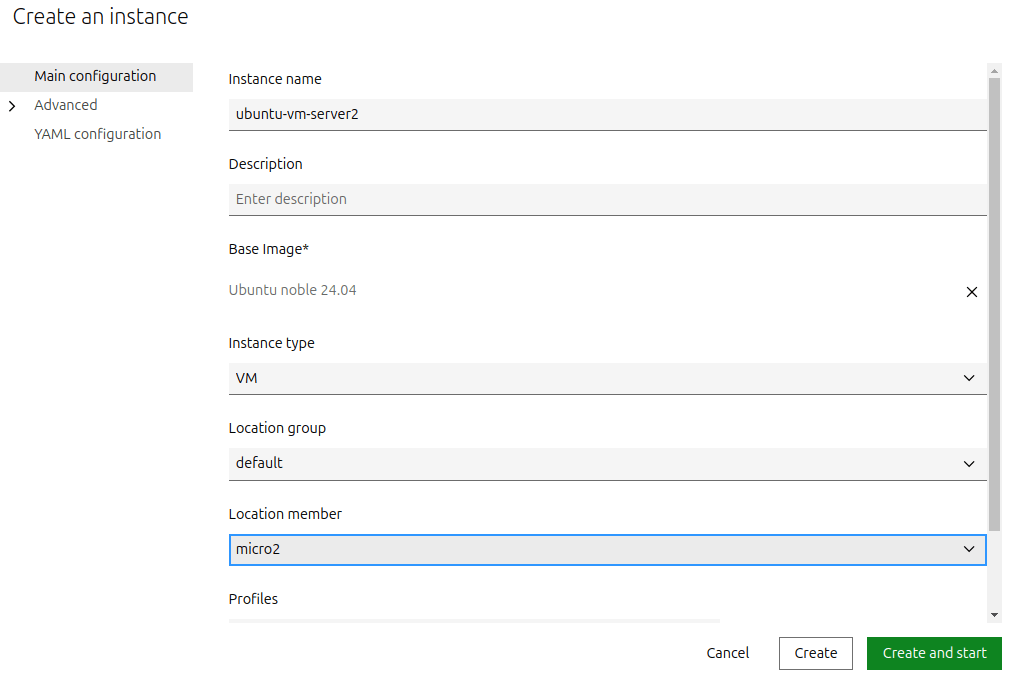
On the resulting screen, optionally enter a name and description for the instance. Then click Browse images to select the image to be used for the instance. Depending on the selected image, you might be able to select the instance type (container or virtual machine). You can also specify one or more profiles to use for the instance.
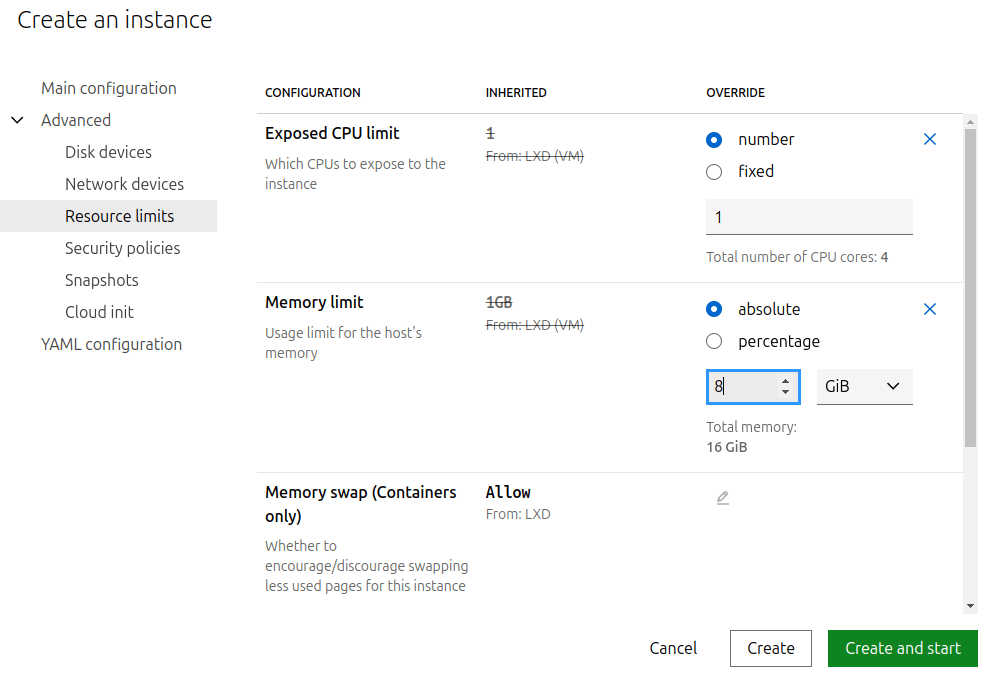
To further tweak the instance configuration or add devices to the instance, go to any of the tabs under Advanced. You can also edit the full instance configuration on the YAML configuration tab.
Finally, click Create or Create and start to create the instance.
Examples
The following CLI and API examples create the instances, but don’t start them.
If you are using the CLI client, you can use lxc launch instead of lxc init to automatically start them after creation.
In the UI, you can choose between Create and Create and start when you are ready to create the instance.
Create a container
To create a container with an Ubuntu 24.04 LTS image from the ubuntu server using the instance name ubuntu-container:
lxc init ubuntu:24.04 ubuntu-container
lxc query --request POST /1.0/instances --data '{
  "name": "ubuntu-container",
  "source": {
    "alias": "24.04",
    "protocol": "simplestreams",
    "server": "https://cloud-images.ubuntu.com/releases",
    "type": "image"
  }
}'

Create a virtual machine
To create a virtual machine with an Ubuntu 24.04 LTS image from the ubuntu server using the instance name ubuntu-vm:
lxc init ubuntu:24.04 ubuntu-vm --vm
lxc query --request POST /1.0/instances --data '{
  "name": "ubuntu-vm",
  "source": {
    "alias": "24.04",
    "protocol": "simplestreams",
    "server": "https://cloud-images.ubuntu.com/releases",
    "type": "image"
  },
  "type": "virtual-machine"
}'

Or with a bigger disk:
lxc init ubuntu:24.04 ubuntu-vm-big --vm --device root,size=30GiB
lxc query --request POST /1.0/instances --data '{
  "devices": {
    "root": {
      "path": "/",
      "pool": "default",
      "size": "30GiB",
      "type": "disk"
    }
  },
  "name": "ubuntu-vm-big",
  "source": {
    "alias": "24.04",
    "protocol": "simplestreams",
    "server": "https://cloud-images.ubuntu.com/releases",
    "type": "image"
  },
  "type": "virtual-machine"
}'

Create a container with specific configuration options
To create a container and limit its resources to one vCPU and 8 GiB of RAM:
lxc init ubuntu:24.04 ubuntu-limited --config limits.cpu=1 --config limits.memory=8GiB
lxc query --request POST /1.0/instances --data '{
  "config": {
    "limits.cpu": "1",
    "limits.memory": "8GiB"
  },
  "name": "ubuntu-limited",
  "source": {
    "alias": "24.04",
    "protocol": "simplestreams",
    "server": "https://cloud-images.ubuntu.com/releases",
    "type": "image"
  }
}'
Create a VM on a specific cluster member
To create a virtual machine on the cluster member micro2, enter the following command:
lxc init ubuntu:24.04 ubuntu-vm-server2 --vm --target micro2
lxc query --request POST /1.0/instances?target=micro2 --data '{
  "name": "ubuntu-vm-server2",
  "source": {
    "alias": "24.04",
    "protocol": "simplestreams",
    "server": "https://cloud-images.ubuntu.com/releases",
    "type": "image"
  },
  "type": "virtual-machine"
}'
Create a container with a specific instance type
LXD supports simple instance types for clouds. Those are represented as a string that can be passed at instance creation time.
The list of supported clouds and instance types can be found at images.lxd.canonical.com/meta/instance-types/.
The syntax allows the three following forms:
<instance type><cloud>:<instance type>c<CPU>-m<RAM in GiB>
For example, the following three instance types are equivalent:
t2.microaws:t2.microc1-m1
To create a container with this instance type:
lxc init ubuntu:24.04 my-instance --type t2.micro
lxc query --request POST /1.0/instances --data '{
  "instance_type": "t2.micro",
  "name": "my-instance",
  "source": {
    "alias": "24.04",
    "protocol": "simplestreams",
    "server": "https://cloud-images.ubuntu.com/releases",
    "type": "image"
  }
}'
Creating an instance with a specific cloud instance type is currently not possible through the UI. Configure the corresponding options manually or through a profile.
Create a VM that boots from an ISO
To create a VM that boots from an ISO:
First, create an empty VM that we can later install from the ISO image:
lxc init iso-vm --empty --vm --config limits.cpu=2 --config limits.memory=4GiB --device root,size=30GiB
Note
Adapt the limits.cpu, limits.memory, and root size based on the hardware recommendations for the ISO image used.
The second step is to import an ISO image that can later be attached to the VM as a storage volume:
lxc storage volume import <pool> <path-to-image.iso> iso-volume --type=iso
Lastly, attach the custom ISO volume to the VM using the following command:
lxc config device add iso-vm iso-volume disk pool=<pool> source=iso-volume boot.priority=10
The boot.priority configuration key ensures that the VM will boot from the ISO first.
Start the VM and connect to the console as there might be a menu you need to interact with:
lxc start iso-vm --console
Once you’re done in the serial console, disconnect from the console using Ctrl+a q and connect to the VGA console using the following command:
lxc console iso-vm --type=vga
You should now see the installer. After the installation is done, detach the custom ISO volume:
lxc storage volume detach <pool> iso-volume iso-vm
Now the VM can be rebooted, and it will boot from disk.
If the VM installed from an ISO is a Linux distribution using systemd, it is possible to install the LXD agent inside of it. This can be done manually as the root user inside the VM:
mount -t 9p config /mnt
cd /mnt
./install.sh
cd /
umount /mnt
systemctl start lxd-agent
First, create an empty VM that we can later install from the ISO image:
lxc query --request POST /1.0/instances --data '{
  "name": "iso-vm",
  "config": {
    "limits.cpu": "2",
    "limits.memory": "4GiB"
  },
  "devices": {
    "root": {
      "path": "/",
      "pool": "default",
      "size": "30GiB",
      "type": "disk"
    }
  },
  "source": {
    "type": "none"
  },
  "type": "virtual-machine"
}'
Note
Adapt the values for limits.cpu, limits.memory, and root: size based on the hardware recommendations for the ISO image used.
The second step is to import an ISO image that can later be attached to the VM as a storage volume:
curl -X POST -H "Content-Type: application/octet-stream" -H "X-LXD-name: iso-volume" \
-H "X-LXD-type: iso" --data-binary @<path-to-image.iso> --unix-socket /var/snap/lxd/common/lxd/unix.socket \
lxd/1.0/storage-pools/<pool>/volumes/custom
Note
When importing an ISO image, you must send both binary data from a file and additional headers.
The lxc query command cannot do this, so you need to use curl or another tool instead.
Lastly, attach the custom ISO volume to the VM using the following command:
lxc query --request PATCH /1.0/instances/iso-vm --data '{
  "devices": {
    "iso-volume": {
      "boot.priority": "10",
      "pool": "<pool>",
      "source": "iso-volume",
      "type": "disk"
    }
  }
}'
The boot.priority configuration key ensures that the VM will boot from the ISO first.
Start the VM and connect to the console as there might be a menu you need to interact with:
lxc query --request PUT /1.0/instances/iso-vm/state --data '{"action": "start"}'
lxc query --request POST /1.0/instances/iso-vm/console --data '{
  "height": 24,
  "type": "console",
  "width": 80
}'
Once you’re done in the serial console, disconnect from the console using Ctrl+a q and connect to the VGA console using the following command:
lxc query --request POST /1.0/instances/iso-vm/console --data '{
  "height": 24,
  "type": "vga",
  "width": 80
}'
You should now see the installer. After the installation is done, detach the custom ISO volume:
lxc query --request GET /1.0/instances/iso-vm
lxc query --request PUT /1.0/instances/iso-vm --data '{
  [...]
  "devices": {}
  [...]
}'
Note
You cannot remove the device through a PATCH request, but you must use a PUT request. Therefore, get the current configuration first and then provide the relevant configuration with an empty devices list through the PUT request.
Now the VM can be rebooted, and it will boot from disk.
If the VM installed from an ISO is a Linux distribution using systemd, it is possible to install the LXD agent inside of it. This can be done manually as the root user inside the VM:
In the Create instance dialog, click Use custom ISO instead of Browse images. You can then upload your ISO file and install a VM from it.