How to manage storage pools
See the following sections for instructions on how to create, configure, view and resize Storage pools.
Create a storage pool
LXD creates a storage pool during initialization. You can add more storage pools later, using the same driver or different drivers.
To create a storage pool, use the following command:
lxc storage create <pool_name> <driver> [configuration_options...]
See the Storage drivers documentation for a list of available configuration options for each driver.
To create a storage pool, select Pools from the Storage section of the main navigation.
On the resulting screen, click Create pool in the upper right corner.
From this screen, you can configure the name and description of your storage pool. You can select a storage driver from the Driver dropdown. Additional settings might appear, depending on the storage driver selected.
Click Create to create the storage pool.

By default, LXD sets up loop-based storage with a sensible default size/quota: 20% of the free disk space, with a minimum of 5 GiB and a maximum of 30 GiB.
Examples
The following examples demonstrate how to create a storage pool using different types of storage drivers.
Create a directory pool
Create a directory pool named pool1:
lxc storage create pool1 dir
Use the existing directory /data/lxd for pool2:
lxc storage create pool2 dir source=/data/lxd
Create a Btrfs pool
Create a loop-backed pool named pool1:
lxc storage create pool1 btrfs
Use the existing Btrfs file system at /some/path for pool2:
lxc storage create pool2 btrfs source=/some/path
Create a pool named pool3 on /dev/sdX:
lxc storage create pool3 btrfs source=/dev/sdX
Create an LVM pool
Create a loop-backed pool named pool1 (the LVM volume group will also be called pool1):
lxc storage create pool1 lvm
Use the existing LVM volume group called my-pool for pool2:
lxc storage create pool2 lvm source=my-pool
Use the existing LVM thin pool called my-pool in volume group my-vg for pool3:
lxc storage create pool3 lvm source=my-vg lvm.thinpool_name=my-pool
Create a pool named pool4 on /dev/sdX (the LVM volume group will also be called pool4):
lxc storage create pool4 lvm source=/dev/sdX
Create a pool named pool5 on /dev/sdX with the LVM volume group name my-pool:
lxc storage create pool5 lvm source=/dev/sdX lvm.vg_name=my-pool
Create a ZFS pool
Create a loop-backed pool named pool1 (the ZFS zpool will also be called pool1):
lxc storage create pool1 zfs
Create a loop-backed pool named pool2 with the ZFS zpool name my-tank:
lxc storage create pool2 zfs zfs.pool_name=my-tank
Use the existing ZFS zpool my-tank for pool3:
lxc storage create pool3 zfs source=my-tank
Use the existing ZFS dataset my-tank/slice for pool4:
lxc storage create pool4 zfs source=my-tank/slice
Use the existing ZFS dataset my-tank/zvol for pool5 and configure it to use ZFS block mode:
lxc storage create pool5 zfs source=my-tank/zvol volume.zfs.block_mode=yes
Create a pool named pool6 on /dev/sdX (the ZFS zpool will also be called pool6):
lxc storage create pool6 zfs source=/dev/sdX
Create a pool named pool7 on /dev/sdX with the ZFS zpool name my-tank:
lxc storage create pool7 zfs source=/dev/sdX zfs.pool_name=my-tank
Create a Ceph RBD pool
Create an OSD storage pool named pool1 in the default Ceph cluster (named ceph):
lxc storage create pool1 ceph
Create an OSD storage pool named pool2 in the Ceph cluster my-cluster:
lxc storage create pool2 ceph ceph.cluster_name=my-cluster
Create an OSD storage pool named pool3 with the on-disk name my-osd in the default Ceph cluster:
lxc storage create pool3 ceph ceph.osd.pool_name=my-osd
Use the existing OSD storage pool my-already-existing-osd for pool4:
lxc storage create pool4 ceph source=my-already-existing-osd
Use the existing OSD erasure-coded pool ecpool and the OSD replicated pool rpl-pool for pool5:
lxc storage create pool5 ceph source=rpl-pool ceph.osd.data_pool_name=ecpool
Create a CephFS pool
Note
Each CephFS file system consists of two OSD storage pools, one for the actual data and one for the file metadata.
Use the existing CephFS file system my-filesystem for pool1:
lxc storage create pool1 cephfs source=my-filesystem
Use the sub-directory my-directory from the my-filesystem file system for pool2:
lxc storage create pool2 cephfs source=my-filesystem/my-directory
Create a CephFS file system my-filesystem with a data pool called my-data and a metadata pool called my-metadata for pool3:
lxc storage create pool3 cephfs source=my-filesystem cephfs.create_missing=true cephfs.data_pool=my-data cephfs.meta_pool=my-metadata
Create a Ceph Object pool
Note
When using the Ceph Object driver, you must have a running Ceph Object Gateway radosgw URL available beforehand.
Use the existing Ceph Object Gateway https://www.example.com/radosgw to create pool1:
lxc storage create pool1 cephobject cephobject.radosgw.endpoint=https://www.example.com/radosgw
Create a Dell PowerFlex pool
Create a storage pool named pool1 using the PowerFlex pool sp1 in the protection domain pd1:
lxc storage create pool1 powerflex powerflex.pool=sp1 powerflex.domain=pd1 powerflex.gateway=https://powerflex powerflex.user.name=lxd powerflex.user.password=foo
Create a storage pool named pool2 using the ID of PowerFlex pool sp1:
lxc storage create pool2 powerflex powerflex.pool=<ID of sp1> powerflex.gateway=https://powerflex powerflex.user.name=lxd powerflex.user.password=foo
Create a storage pool named pool3 that uses PowerFlex volume snapshots (see Limitations) when creating volume copies:
lxc storage create pool3 powerflex powerflex.clone_copy=false powerflex.pool=<id of sp1> powerflex.gateway=https://powerflex powerflex.user.name=lxd powerflex.user.password=foo
Create a storage pool named pool4 that uses a PowerFlex gateway with a certificate that is not trusted:
lxc storage create pool4 powerflex powerflex.gateway.verify=false powerflex.pool=<id of sp1> powerflex.gateway=https://powerflex powerflex.user.name=lxd powerflex.user.password=foo
Create a storage pool named pool5 that explicitly uses the PowerFlex SDC:
lxc storage create pool5 powerflex powerflex.mode=sdc powerflex.pool=<id of sp1> powerflex.gateway=https://powerflex powerflex.user.name=lxd powerflex.user.password=foo
Create a Pure Storage pool
Create a storage pool named pool1 that uses NVMe/TCP by default:
lxc storage create pool1 pure pure.gateway=https://<pure-storage-address> pure.api.token=<pure-storage-api-token>
Create a storage pool named pool2 that uses a Pure Storage gateway with a certificate that is not trusted:
lxc storage create pool2 pure pure.gateway=https://<pure-storage-address> pure.gateway.verify=false pure.api.token=<pure-storage-api-token>
Create a storage pool named pool3 that uses iSCSI to connect to Pure Storage array:
lxc storage create pool3 pure pure.gateway=https://<pure-storage-address> pure.api.token=<pure-storage-api-token> pure.mode=iscsi
Create a storage pool named pool4 that uses NVMe/TCP to connect to Pure Storage array via specific target addresses:
lxc storage create pool4 pure pure.gateway=https://<pure-storage-address> pure.api.token=<pure-storage-api-token> pure.mode=nvme pure.target=<target_address_1>,<target_address_2>
You can select a storage driver from the Driver dropdown.
Some storage drivers offer additional settings. Click the driver name in the secondary menu to further configure the storage pool.

See the Storage drivers documentation for a list of available configuration options for each driver.
Create a storage pool in a cluster
If you are running a LXD cluster and want to add a storage pool, you must create the storage pool for each cluster member separately. The reason for this is that the configuration, for example, the storage location or the size of the pool, might be different between cluster members.
To create a storage pool via the CLI, start by creating a pending storage pool on each member with the --target=<cluster_member> flag and the appropriate configuration for the member.
Make sure to use the same storage pool name for all members.
Then create the storage pool without specifying the --target flag to actually set it up.
Also see How to configure storage for a cluster.
Note
For most storage drivers, the storage pools exist locally on each cluster member. That means that if you create a storage volume in a storage pool on one member, it will not be available on other cluster members.
This behavior is different for Ceph-based storage pools (ceph, cephfs and cephobject) where each storage pool exists in one central location and therefore, all cluster members access the same storage pool with the same storage volumes.
Examples
See the following examples for different storage drivers for instructions on how to create local or remote storage pools in a cluster.
Create a local storage pool
Create a storage pool named my-pool using the ZFS driver at different locations and with different sizes on three cluster members:
~$ lxc storage create my-pool zfs source=/dev/sdX size=10GiB --target=vm01Storage pool my-pool pending on member vm01~$ lxc storage create my-pool zfs source=/dev/sdX size=15GiB --target=vm02Storage pool my-pool pending on member vm02~$ lxc storage create my-pool zfs source=/dev/sdY size=10GiB --target=vm03Storage pool my-pool pending on member vm03~$ lxc storage create my-pool zfsStorage pool my-pool createdCreate a remote storage pool
Create a storage pool named my-remote-pool using the Ceph RBD driver and the on-disk name my-osd on three cluster members.
Because the ceph.osd.pool_name configuration setting isn’t member-specific, it must be set when creating the actual storage pool:
~$ lxc storage create my-remote-pool ceph --target=vm01Storage pool my-remote-pool pending on member vm01~$ lxc storage create my-remote-pool ceph --target=vm02Storage pool my-remote-pool pending on member vm02~$ lxc storage create my-remote-pool ceph --target=vm03Storage pool my-remote-pool pending on member vm03~$ lxc storage create my-remote-pool ceph ceph.osd.pool_name=my-osdStorage pool my-remote-pool createdCreate a second storage pool named my-remote-pool2 using the Dell PowerFlex driver in SDC mode and the pool sp1 in protection domain pd1:
~$ lxc storage create my-remote-pool2 powerflex --target=vm01Storage pool my-remote-pool2 pending on member vm01~$ lxc storage create my-remote-pool2 powerflex --target=vm02Storage pool my-remote-pool2 pending on member vm02~$ lxc storage create my-remote-pool2 powerflex --target=vm03Storage pool my-remote-pool2 pending on member vm03~$ lxc storage create my-remote-pool2 powerflex powerflex.mode=sdc powerflex.pool=sp1 powerflex.domain=pd1 powerflex.gateway=https://powerflex powerflex.user.name=lxd powerflex.user.password=fooStorage pool my-remote-pool2 createdCreate a third storage pool named my-remote-pool3 using the Pure Storage driver:
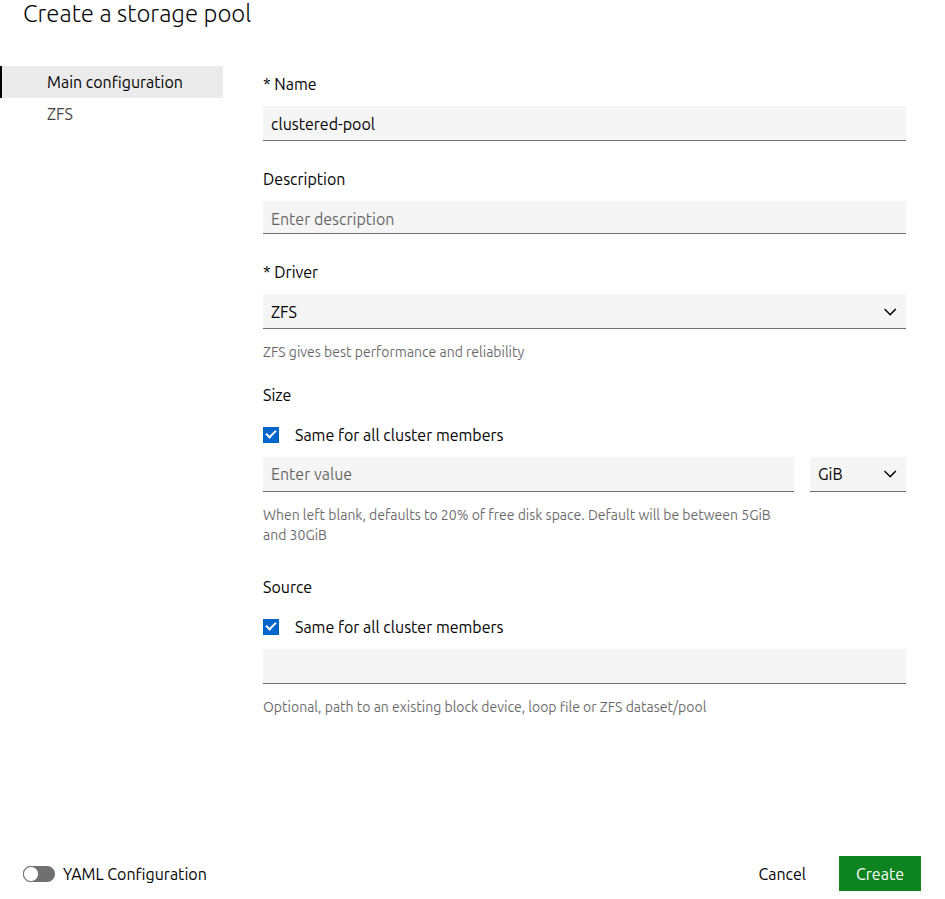
~$ lxc storage create my-remote-pool3 pure --target=vm01Storage pool my-remote-pool3 pending on member vm01~$ lxc storage create my-remote-pool3 pure --target=vm02Storage pool my-remote-pool3 pending on member vm02~$ lxc storage create my-remote-pool3 pure --target=vm03Storage pool my-remote-pool3 pending on member vm03~$ lxc storage create my-remote-pool3 pure pure.gateway=https://<pure-storage-address> pure.api.token=<pure-storage-api-token>Storage pool my-remote-pool3 createdTo create a storage pool in a cluster, select Pools from the Storage section of the main navigation, then click Create pool in the upper right corner.
On the resulting page, configure the storage pool’s name and description. Depending on the selected driver, some settings can be configured per cluster member or applied globally to the cluster.
Finally, click Create to create the storage pool.
Configure storage pool settings
See the Storage drivers documentation for the available configuration options for each storage driver.
General keys for a storage pool (like source) are top-level.
Driver-specific keys are namespaced by the driver name.
Use the following command to set configuration options for a storage pool:
lxc storage set <pool_name> <key> <value>
For example, to turn off compression during storage pool migration for a dir storage pool, use the following command:
lxc storage set my-dir-pool rsync.compression false
You can also edit the storage pool configuration by using the following command:
lxc storage edit <pool_name>
To configure a storage pool, select Pools from the Storage section of the Main navigation.
The resulting screen shows a list of existing storage pools. Click a pool’s name to access its details.
Go to the Configuration tab. Here, you can configure settings such as the storage pool description.
After making changes, click the Save changes button. This button also displays the number of changes you have made.
View storage pools
You can display a list of all available storage pools and check their configuration.
Use the following command to list all available storage pools:
lxc storage list
The resulting table contains the storage pool that you created during initialization (usually called default or local) and any storage pools that you added.
To show detailed information about a specific pool, use the following command:
lxc storage show <pool_name>
To see usage information for a specific pool, run the following command:
lxc storage info <pool_name>
To view available storage pools in the UI, select Pools from the Storage section of the main navigation.
Resize a storage pool
If you need more storage, you can increase the size (quota) of your storage pool. You can only grow the pool (increase its size), not shrink it.
In the CLI, resize a storage pool by changing the size configuration key:
lxc storage set <pool_name> size=<new_size>
This will only work for loop-backed storage pools that are managed by LXD.
To resize a storage pool in the UI, select Pools from the Storage section of the main navigation.
Click the name of a storage pool to open its details page, then go to its Configuration tab. Edit the Size field.
After making changes, click the Save changes button. This button also displays the number of changes you have made.
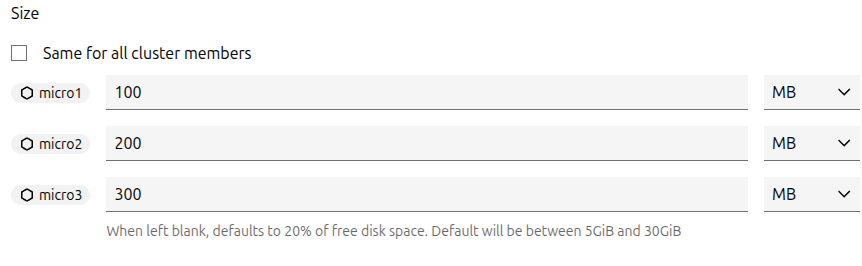
In clustered environments, the Size field appears as a per-member selector, allowing you to configure the size for each cluster member.