
How to back up instances
There are different ways of backing up your instances:
Which method to choose depends both on your use case and on the storage driver you use.
In general, snapshots are quick and space efficient (depending on the storage driver), but they are stored in the same storage pool as the instance and therefore not too reliable. Export files can be stored on different disks and are therefore more reliable. They can also be used to restore the instance into a different storage pool. If you have a separate, network-connected LXD server available, regularly copying instances to this other server gives high reliability as well, and this method can also be used to back up snapshots of the instance.
Note
Custom storage volumes might be attached to an instance, but they are not part of the instance. Therefore, the content of a custom storage volume is not stored when you back up your instance. You must back up the data of your storage volume separately. See How to back up custom storage volumes for instructions.
Use snapshots for instance backup
You can save your instance at a point in time by creating an instance snapshot, which makes it easy to restore the instance to a previous state.
Instance snapshots are stored in the same storage pool as the instance volume itself.
Most storage drivers support optimized snapshot creation (see Feature comparison).
For these drivers, creating snapshots is both quick and space-efficient.
For the dir driver, snapshot functionality is available but not very efficient.
For the lvm driver, snapshot creation is quick, but restoring snapshots is efficient only when using thin-pool mode.
Create a snapshot
Use the following command to create a snapshot of an instance:
lxc snapshot <instance_name> [<snapshot name>]
The snapshot name is optional.
If you don’t specify one, the name follows the naming pattern defined in snapshots.pattern.
Add the --reuse flag in combination with a snapshot name to replace an existing snapshot.
By default, snapshots are kept forever, unless the snapshots.expiry configuration option is set.
To retain a specific snapshot even if a general expiry time is set, use the --no-expiry flag.
For virtual machines, you can add the --stateful flag to capture not only the data included in the instance volume but also the running state of the instance.
Note that this feature is not fully supported for containers because of CRIU limitations.
To create a snapshot of an instance, send a POST request to the snapshots endpoint:
lxc query --request POST /1.0/instances/<instance_name>/snapshots --data '{"name": "<snapshot_name>"}'
The snapshot name is optional.
If you set it to an empty string, the name follows the naming pattern defined in snapshots.pattern.
By default, snapshots are kept forever, unless the snapshots.expiry configuration option is set.
To set an expiration date, add theexpires_at field to the request data.
To retain a specific snapshot even if a general expiry time is set, set the expires_at field to "0001-01-01T00:00:00Z".
If you want to replace an existing snapshot, delete it first and then create another snapshot with the same name.
For virtual machines, you can add "stateful": true to the request data to capture not only the data included in the instance volume but also the running state of the instance.
Note that this feature is not fully supported for containers because of CRIU limitations.
See POST /1.0/instances/{name}/snapshots for more information.
To create a snapshot of an instance, go to the instance detail page and switch to the Snapshots tab. Click Create snapshot to open the dialog to create a snapshot.
The snapshot name is optional.
If you don’t specify one, the name follows the naming pattern defined in snapshots.pattern.
You can check and update this option by switching to the Configuration tab and selecting Advanced > Snapshots, or simply by clicking See configuration.
By default, snapshots are kept forever, unless you specify an expiry date and time, or the snapshots.expiry configuration option is set for the instance.
For virtual machines, you can choose to create a stateful snapshot to capture not only the data included in the instance volume but also the running state of the instance.
Note that this feature requires migration.stateful to be enabled.
View, edit or delete snapshots
Use the following command to display the snapshots for an instance:
lxc info <instance_name>
You can view or modify snapshots in a similar way to instances, by referring to the snapshot with <instance_name>/<snapshot_name>.
To show configuration information about a snapshot, use the following command:
lxc config show <instance_name>/<snapshot_name>
To change the expiry date of a snapshot, use the following command:
lxc config edit <instance_name>/<snapshot_name>
Note
In general, snapshots cannot be edited, because they preserve the state of the instance. The only exception is the expiry date. Other changes to the configuration are silently ignored.
To delete a snapshot, use the following command:
lxc delete <instance_name>/<snapshot_name>
To retrieve the snapshots for an instance, send a GET request to the snapshots endpoint:
lxc query --request GET /1.0/instances/<instance_name>/snapshots
To show configuration information about a snapshot, send the following request:
lxc query --request GET /1.0/instances/<instance_name>/snapshots/<snapshot_name>
To change the expiry date of a snapshot, send a PATCH request:
lxc query --request PATCH /1.0/instances/<instance_name>/snapshots/<snapshot_name> --data '{
  "expires_at": "2029-03-23T17:38:37.753398689-04:00"
}'
Note
In general, snapshots cannot be modified, because they preserve the state of the instance. The only exception is the expiry date. Other changes to the configuration are silently ignored.
To delete a snapshot, send a DELETE request:
lxc query --request DELETE /1.0/instances/<instance_name>/snapshots/<snapshot_name>
See GET /1.0/instances/{name}/snapshots, GET /1.0/instances/{name}/snapshots/{snapshot}, PATCH /1.0/instances/{name}/snapshots/{snapshot}, and DELETE /1.0/instances/{name}/snapshots/{snapshot} for more information.
To see all snapshots for an instance, go to the instance detail page and switch to the Snapshots tab.
From the snapshot list, you can choose to edit the name or expiry date of a specific snapshot, create an image based on the snapshot, restore it to the instance, or delete it.
Schedule instance snapshots
You can configure an instance to automatically create snapshots at specific times (at most once every minute).
To do so, set the snapshots.schedule instance option.
For example, to configure daily snapshots:
lxc config set <instance_name> snapshots.schedule @daily
lxc query --request PATCH /1.0/instances/<instance_name> --data '{
  "config": {
    "snapshots.schedule": "@daily"
  }
}'
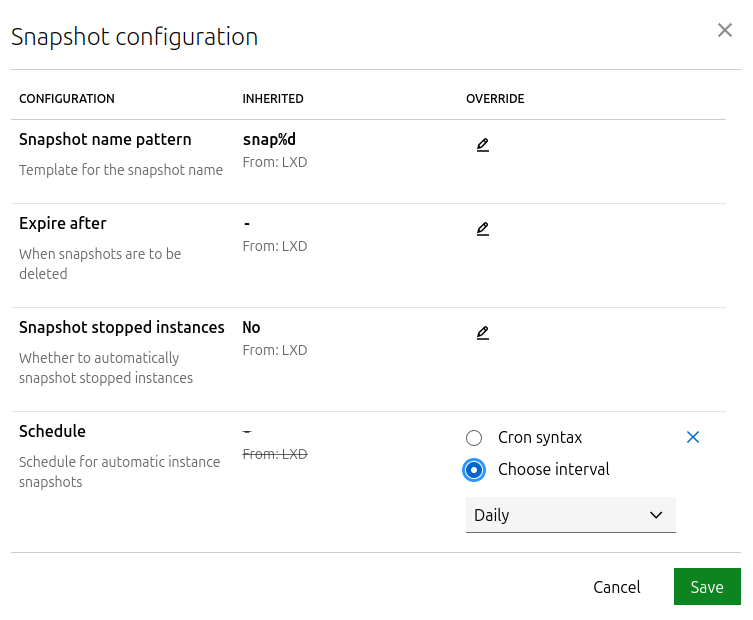
To configure taking a snapshot every day at 6 am:
lxc config set <instance_name> snapshots.schedule "0 6 * * *"
lxc query --request PATCH /1.0/instances/<instance_name> --data '{
  "config": {
    "snapshots.schedule": "0 6 * * *"
  }
}'
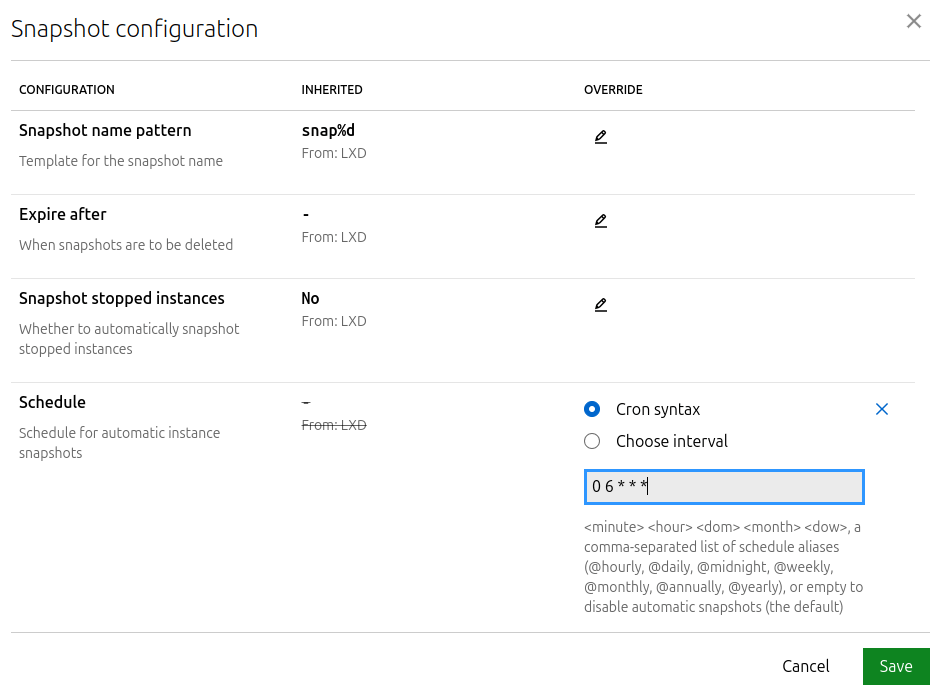
When scheduling regular snapshots, consider setting an automatic expiry (snapshots.expiry) and a naming pattern for snapshots (snapshots.pattern).
You should also configure whether you want to take snapshots of instances that are not running (snapshots.schedule.stopped).
Restore an instance snapshot
You can restore an instance to any of its snapshots.
To restore an instance to a snapshot, use the following command:
lxc restore <instance_name> <snapshot_name>
If the snapshot is stateful (which means that it contains information about the running state of the instance), you can add the --stateful flag to restore the state.
To restore an instance to a snapshot, send a PUT request to the instance:
lxc query --request PUT /1.0/instances/<instance_name> --data '{
  "restore": "<instance_name>/<snapshot_name>"
}'
If the snapshot is stateful (which means that it contains information about the running state of the instance), you can add "stateful": true to the request data:
lxc query --request PUT /1.0/instances/<instance_name> --data '{
  "restore": "<instance_name>/<snapshot_name>",
  "stateful": true
}'
See PUT /1.0/instances/{name} for more information.
To restore an instance to a snapshot, click the Restore snapshot button () next to the snapshot that you want to restore.
If the snapshot is stateful (which means that it contains information about the running state of the instance), select Restore the instance state if you want to restore the state.
Use export files for instance backup
You can export the full content of your instance to a standalone file that can be stored at any location. For highest reliability, store the backup file on a different file system to ensure that it does not get lost or corrupted.
Note
The UI does not currently support exporting and importing instances.
Export an instance
Use the following command to export an instance to a compressed file (for example, /path/to/my-instance.tgz):
lxc export <instance_name> [<file_path>]
If you do not specify a file path, the export file is saved as <instance_name>.<extension> in the working directory (for example, my-container.tar.gz).
Warning
If the output file (<instance_name>.<extension> or the specified file path) already exists, the command overwrites the existing file without warning.
You can add any of the following flags to the command:
--compressionBy default, the output file uses
gzipcompression. You can specify a different compression algorithm (for example,bzip2) or turn off compression with--compression=none.--optimized-storageIf your storage pool uses the
btrfsor thezfsdriver, add the--optimized-storageflag to store the data as a driver-specific binary blob instead of an archive of individual files. In this case, the export file can only be used with pools that use the same storage driver.Exporting a volume in optimized mode is usually quicker than exporting the individual files. Snapshots are exported as differences from the main volume, which decreases their size and makes them easily accessible.
--instance-onlyBy default, the export file contains all snapshots of the instance. Add this flag to export the instance without its snapshots.
To create a backup of an instance, send a POST request to the backups endpoint:
lxc query --request POST /1.0/instances/<instance_name>/backups --data '{"name": ""}'
You can specify a name for the backup, or use the default (backup0, backup1 and so on).
You can add any of the following fields to the request data:
"compression_algorithm": "bzip2"By default, the output file uses
gzipcompression. You can specify a different compression algorithm (for example,bzip2) or turn off compression withnone."optimized-storage": trueIf your storage pool uses the
btrfsor thezfsdriver, set the"optimized-storage"field totrueto store the data as a driver-specific binary blob instead of an archive of individual files. In this case, the backup can only be used with pools that use the same storage driver.Exporting a volume in optimized mode is usually quicker than exporting the individual files. Snapshots are exported as differences from the main volume, which decreases their size and makes them easily accessible.
"instance-only": trueBy default, the backup contains all snapshots of the instance. Set this field to
trueto back up the instance without its snapshots.
After creating the backup, you can download it with the following request:
lxc query --request GET /1.0/instances/<instance_name>/backups/<backup_name>/export > <file_name>
Remember to delete the backup when you don’t need it anymore:
lxc query --request DELETE /1.0/instances/<instance_name>/backups/<backup_name>
See POST /1.0/instances/{name}/backups, GET /1.0/instances/{name}/backups/{backup}/export, and DELETE /1.0/instances/{name}/backups/{backup} for more information.
Restore an instance from an export file
You can import an export file (for example, /path/to/my-backup.tgz) as a new instance.
To import an export file, use the following command:
lxc import <file_path> [<instance_name>]
If you do not specify an instance name, the original name of the exported instance is used for the new instance. If an instance with that name already (or still) exists in the specified storage pool, the command returns an error. In that case, either delete the existing instance before importing the backup or specify a different instance name for the import.
Add the --storage flag to specify which storage pool to use, or the --device flag to override the device configuration (syntax: --device <device_name>,<device_option>=<value>).
To import an export file, post it to the /1.0/instances endpoint:
curl -X POST -H "Content-Type: application/octet-stream" -T <file_path> \
--unix-socket /var/snap/lxd/common/lxd/unix.socket lxd/1.0/instances
If an instance with that name already (or still) exists in the specified storage pool, the command returns an error. In this case, delete the existing instance before importing the backup.
See POST /1.0/instances for more information.
Copy an instance to a backup server
You can copy an instance to a secondary backup server to back it up.
See Secondary backup LXD server for more information, and How to move existing LXD instances between servers for instructions.