
First steps with LXD
This tutorial guides you through your first steps with LXD. You’ll begin by installing and initializing LXD. Then you’ll use its CLI or graphical web UI to work with instances, including both containers and virtual machines. You’ll learn how to create and configure instances, create snapshots, and more.
Requirements
At least 20 GiB free disk space
A Linux distribution installed
Install LXD using snap
This section of the tutorial assumes that you have the snap packaging system available on your system, which is the recommended way to install and update LXD.
To install LXD using snap, run:
sudo snap install lxd
If snap is not installed or not supported
If you see an error message indicating that snap is not installed, visit the Snap installation documentation and follow the instructions there to install it.
If you use a Linux distribution that does not support snap, see Other Linux installation options to install LXD by other means if possible, then skip to the next section of this tutorial.
If the LXD snap is already installed
This tutorial is designed for LXD version 5.21 and higher. If you see an error message that the LXD snap is already installed, run the following command to find the channel the snap is tracking:
snap list lxd
The Tracking column lists the installed snap channel. If the number shown is 5.21 or higher, run the following command to update the snap to the most recent release in its channel:
sudo snap refresh lxd
Otherwise, if the number shown is lower, an older version is installed. In this case, upgrade to the 5.21/stable channel by following the instructions in this guide: Change the snap channel.
Add the current user to the lxd group
Important security notice
Local access to LXD through the Unix socket always grants full access to LXD. This includes the ability to attach file system paths or devices to any instance as well as tweak the security features on any instance.
Therefore, you should only give such access to users who you’d trust with root access to your system.
For more information, see Access to the LXD daemon.
Installing LXD through its snap should automatically create a lxd group on your system. The user you are logged in as must be in this group to interact with LXD.
Enter the following commands. The first command adds your user to the lxd group.
The second command starts a new shell where the group membership takes effect immediately.
sudo usermod -aG lxd "$USER"
newgrp lxd
Initialize LXD
Next, initialize LXD using a minimal setup with default options.
Run:
lxd init --minimal
If this command results in an error message, your group membership might not have taken effect. In this case, close and re-open your terminal, then try again.
If you do not see any message when running this command, that means it has succeeded. Congratulations! You have successfully installed and initialized LXD. Continue on to learn how to use some of LXD’s core features.
About the initialization options
The lxd init command can be run again later to update the options. Once you have learned more about LXD, you might want to tune the initialization options according to your own preferences, or learn how to use a preseed file to initialize LXD from a saved set of options. For now, the minimal configuration is sufficient.
Enable the LXD UI
While the installation and initialization steps must be performed via the command line interface, a graphical interface (the LXD UI) is available for use after these setup steps. The LXD UI is accessed through your web browser.
If you prefer to use the LXD UI, expand and follow the steps below.
View steps to enable the LXD UI
Expose the LXD server to the local network
By default, LXD is exposed through a Unix socket only and is not accessible over HTTPS. To access and manage LXD through a web browser using HTTPS, we must set the core.https_address server configuration option. We will use the local network by configuring this to the IPv4 loopback address 127.0.0.1 and port 8443. Run:
lxc config set core.https_address 127.0.0.1:8443
Confirm that the core.https_address option has been set:
user@host:~$ lxc config get core.https_address
127.0.0.1:8443
core.https_address
For simplicity, the tutorial asks you to set the core.https_address to the IPv4 loopback address. If you prefer, you can set this later to the IPv6 loopback address ([::1]:8443), or to an address that is reachable over a network for remote access.
Set up UI access
Go to this URL in your browser: https://localhost:8443
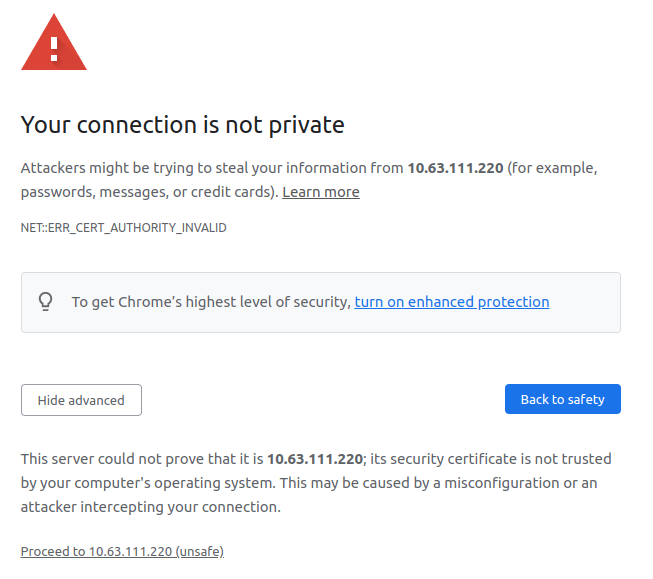
If you have not set up a secure TLS server certificate, LXD uses a self-signed certificate, which will cause a security warning in your browser. Use your browser’s mechanism to continue this time despite the security warning.
For example, in Chrome, click Advanced, then follow the link to Proceed at the bottom as shown below:
In Firefox, click Advanced, then follow the link to Accept the risk and continue.
Set up the browser certificate
Follow the instructions in the LXD UI browser page to install and select the browser certificate, also called a client certificate.
If you have previously installed a certificate for the LXD UI, your browser will offer you the option to use it. Confirm that the installed certificate’s issuer is listed in the LXD UI, then select it.
After you have selected your certificate, follow the LXD UI’s on-page instructions to set up the trust token.
Finally, click Connect in the UI to complete gaining access. You should then see the Instances page.
As you continue on with this tutorial, notice that many of the following sections include sets of tabs. When the UI tab is available, you can now use the instructions in that tab.
Create instances
LXD uses images to create instances from either local or remote image servers. We will fetch our container images from the remote ubuntu: server, which hosts official Ubuntu images.
Create and start containers
For managing instances, we use the lxc command instead of lxd.
The lxc launch command creates an instance, then immediately starts it. By default, it creates a container instead of a virtual machine. Use this command to launch a container named first, based on the Ubuntu 24.04 LTS image:
lxc launch ubuntu:24.04 first
This downloads and unpacks the image, then uses it to create and start a container. Since this command does not specify a remote server, the default ubuntu: server is used. Once downloaded, this image is cached temporarily in the local image server.
We can also create an instance without starting it, using the lxc init command. Note that this differs from the lxd init command you used to initialize LXD.
Create a container called second but do not start it, using the same image as the first:
lxc init ubuntu:24.04 second
Since the image is now cached locally, this container is created much more quickly than the first.
To confirm that the containers have been created, run:
lxc list
You should see both containers you created in the output, with the first container in a RUNNING state and the second container in a STOPPED state.
To create a container, select Instances from the main navigation, then click Create instance.
In the form that opens, name this instance first. Click Browse images and select the Ubuntu 24.04 LTS image. Note that the Source for this image is Ubuntu, which is the remote ubuntu: server.
Launch the container by clicking the Create and start button.
This downloads and unpacks the image, then uses it to create and start a container. The image is cached temporarily in the local image server.
Create another container named second, using the same image. This time, click Create instead of Create and start. This container will be created but not started.
Since the image is now cached locally, this container is created much more quickly than the first.
Create and start a VM
Next, let’s launch a VM using the Ubuntu 24.04 LTS image.
Although we will use the same image name as we used when creating a container, LXD will download a variant of the image built specifically for VMs. This image is not yet cached, and it is larger than the container VM, so it will take longer to download.
We will use the same lxc launch command, this time to create an instance named ubuntu-vm. To create it as a VM instead of a container, we must add the --vm flag. Run:
lxc launch ubuntu:24.04 ubuntu-vm --vm
Open the form to create an instance, and set its name to ubuntu-vm. Browse for an image. Do not select the the cached Ubuntu 24.04 image at the top, which has a Type set to container. Instead, select the Ubuntu 24.04 LTS image with the Type of all, which can be used for VMs.
After you select this image and return to the main creation form, set the Instance type to VM. Create and start the VM.

Configure, create, and start a desktop VM
A desktop Ubuntu VM is available from the remote images: server. This server is provided by Canonical for unofficial images of not only Ubuntu variants but other Linux distributions, for testing and development purposes.
The limits.memory option defaults to 1 GiB for VMs. For the desktop VM to run smoothly, we must allocate a higher memory limit.
You can configure instance options during creation or afterward. We will configure the desktop VM during creation, using the --config flag to set limits.memory to 4GiB.
Run:
lxc launch images:ubuntu/24.04/desktop ubuntu-desktop --vm --config limits.memory=4GiB
Tip
This is a large image and can take a while to download. If you like, you can open a separate terminal and continue with the next sections of the tutorial while you wait for the download to finish.
Once the VM has launched, confirm that its memory limit is set to 4 GiB:
lxc config get ubuntu-desktop limits.memory
Open the form to create a new instance. Name it ubuntu-desktop.
Browse for its image, and filter by variant desktop to find the Ubuntu 24.04 LTS desktop image. Note that its Source is LXD Images, meaning that it uses the remote images: server. Select this image.
In the submenu, go to Resource limits and override the Memory limit to 4 GiB.
Finally, click Create and start to start the VM.
Inspect instances
List all the instances that you created:
lxc list
The output tells you the name, state, IP addresses, instance type, and number of snapshots for each instance.
You can retrieve further information about each instance with lxc info, including its architecture, process ID, usage data, and more. Run:
lxc info first
View the list of instances that you created:
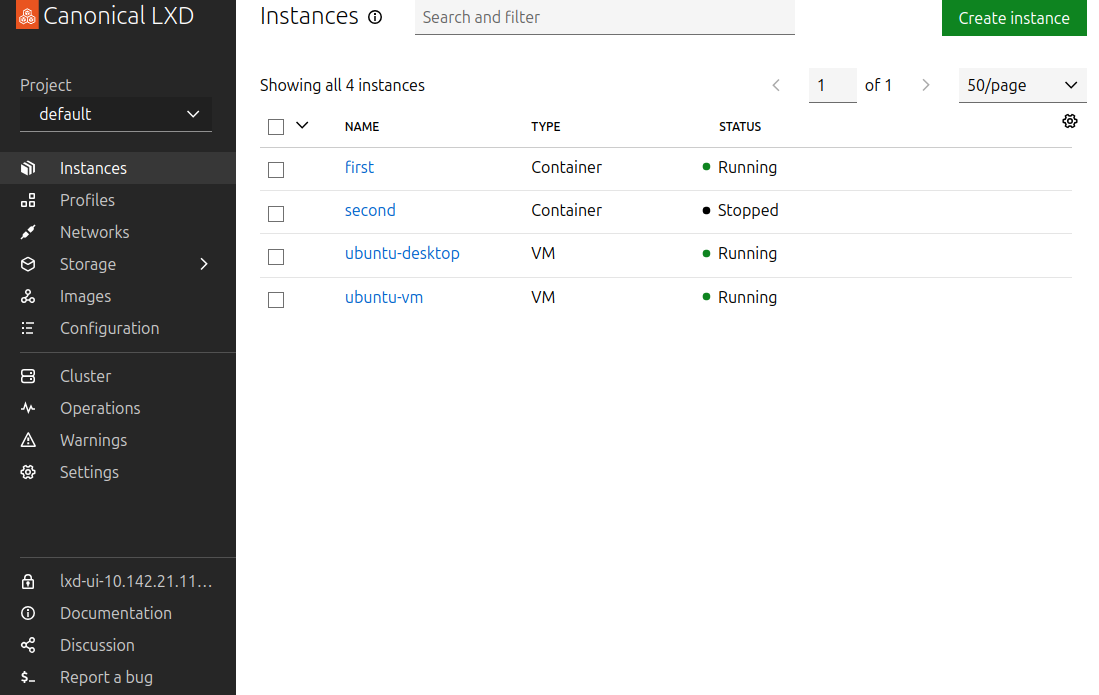
This list tells you the name, instance type, description, IPv4 address, and status for each instance. When you hover over an instance row, icons appear to start, restart, freeze (pause), or stop the instance.
Click one of the rows (but not on the instance name) to view the instance summary panel:

This panel provides more information, including the instance’s architecture and process ID.
In either the list of instances or the instance summary panel, click the name of the instance to view its detail page. The Overview tab displays general information about the instance, including its architecture, process ID, creation date, and usage data. You can also view the instance’s network, devices, and profiles here.
Click the Configuration tab. From here, you can both view and edit the instance configuration details. You can also click the YAML Configuration toggle at the bottom of this tab to view and edit the full YAML representation of the instance configuration:

The Console tab is mainly useful for viewing information from the startup process of an instance, and for viewing the graphic console of a desktop VM. Open this tab for the ubuntu-desktop VM to see that you can access the graphic console.
You can view and download log files from the Logs tab. Running instances log only limited information by default. More log files are added if an instance ends up in an error state.
We will explore the Terminal and Snapshots tabs later in this tutorial. For now, click the word Instances at the top of this page to return to the list of instances.
Start a stopped instance
When you ran lxc list, you saw that the second container’s state is STOPPED, because we used lxc init to create the container instead of lxc launch.
Start the second container:
lxc start second
Run lxc list again to confirm that it is now in a RUNNING state.
In the list of instances, you should see that the second container’s state is Stopped, because you created the container but did not start it.
Start the second container by clicking the Start button (▷) that appears when you hover over its row.
See How to create instances and How to manage instances for more information.
Configure instances
Each instance created inherits a default set of configuration options. You can customize these options for each instance. See Instance options for a list of available options.
Earlier, we set the limits.memory option for the ubuntu-desktop VM during its creation. We can also update an instance’s configuration after creation.
As an example, let’s reduce the second container’s resource limits. Follow the instructions below to update its limits.cpu to 1, and its limits.memory to 192MiB.
Run:
lxc config set second limits.cpu=1 limits.memory=192MiB
To confirm that the options have been set, use the lxc config get command for each option:
lxc config get second limits.cpu
lxc config get second limits.memory
You can also use the lxc config show command to view values for all the options. Run:
lxc config show second
Go to the detail page for the second container, then its Configuration tab.
From the Resource limits section, override the Exposed CPU limit to a number of 1.
Override the Memory limit to an absolute value of 192. Change the dropdown value from GiB to MiB.
Save the updated configuration, then confirm that you see the updated values reflected in the Configuration tab.
Open an interactive shell into instances
Thus far, we have only acted upon instances from outside of them, from the host system. It’s time to see what we can do inside an instance.
First, let’s run a couple of standard Linux commands on your host system. The first command below displays memory information in megabytes, and the second displays the number of available CPUs.
In a terminal, run:
free -m
nproc
Take note of the outputs. We will compare them to the outputs from the same commands run within your instances.
Use lxc shell to open an interactive shell into the first container:
lxc shell first
Notice that your command prompt has changed. You are now logged in as root inside the first instance.
In this shell session, run the same commands as you did on the host:
free -m
nproc
Note that the total memory returned by free -m and the value returned by nproc are identical for the host system and the first container. This is because by default, containers inherit the resources from their host environment.
Next, exit the first container:
exit
Enter an interactive shell into the second container:
lxc shell second
Then in the second container, run the same commands:
free -m
nproc
For the second container, notice that only 192 MiB total memory and 1 CPU is available. These are the options that we configured for this container earlier.
You can try other commands to interact with your instance. For example, enter the following command to display information about the operating system:
cat /etc/*release
Or have some fun:
apt update
apt install fortune -y
/usr/games/fortune
When you’re done, exit the shell:
exit
Your command prompt should return to that of the host system. From here, try out one other way to run commands inside an instance: the lxc exec command. This command is used to execute a single command inside an instance from the host system, without opening a shell. Run:
lxc exec second -- free -m
Notice that the output is the same as if you had run lxc shell second then the free -m command from inside the second container.
See How to run commands in an instance for more information.
Go to the Terminal tab for the first container. This tab provides an interactive shell into an instance.
From there, run the same commands as you did on the host:
free -m
nproc
Note that the total memory returned by free -m and the value returned by nproc are identical for the host system and the first container. This is because by default, containers inherit the resources from their host environment.
Go to the Terminal tab for the second container and enter the same commands. Notice that only 192 MiB total memory and 1 CPU is available. These are the options that we configured for this container earlier.
You can try other commands to interact with your instance. For example, enter the following command to display information about the operating system:
cat /etc/*release
Or have some fun:
apt update
apt install fortune
/usr/games/fortune
Access files
To access files inside an instance from your host system, use the CLI.
As an example, let’s create a file in the first container, pull it out to the host system, modify it, then push it back to the container.
From the host system, use lxc exec to create an empty helloworld file in the first container:
lxc exec first -- touch helloworld.txt
Confirm that the file is empty:
lxc exec first -- cat helloworld.txt
Since the touch command creates an empty file, the cat command should display no output.
Pull this file from the first container to the current directory of your host system:
lxc file pull first/root/helloworld.txt .
Add content to the file:
echo "Hello world" > helloworld.txt
Push the file back to the container:
lxc file push helloworld.txt first/root/helloworld.txt
Now again view the content of the file on the container:
lxc exec first -- cat helloworld.txt
You should see the line that you added:
your-user@host-system:~$ lxc exec first -- cat helloworld.txt
Hello world!
See How to access files in an instance for more information.
Back up and restore instances by creating snapshots
You can back up your instance by creating a snapshot, then use it later to restore the instance to a saved state.
The following command creates a snapshot called “clean” that saves the current state of your instance. Run:
lxc snapshot first clean
Let’s see how many snapshots are available for the first container:
lxc list first
The SNAPSHOTS column shows the number of available snapshots.
Let’s find out more information about the available snapshots for the first container:
lxc info first
At the bottom of the output, a Snapshots table displays details about available snapshots.
If you accidentally do something to break an instance, or wish to revert recent changes to it, you can restore a previous state through a snapshot. To see how this works, let’s deliberately break the first container by deleting the bash command from it:
lxc exec first -- rm /usr/bin/bash
Confirm that you can no longer use the bash command on first:
lxc exec first -- bash
This results in an error because the bash command no longer exists. Luckily, we have a snapshot we can use to restore the container to a previous state. Run:
lxc restore first clean
Confirm that you can now enter the bash shell:
lxc exec first -- bash
Then exit the shell:
exit
When you no longer need a snapshot, you can delete it. Go ahead and delete the clean snapshot:
lxc delete first/clean
Go to the instance detail page of the first container and select the Snapshots tab.
Click Create snapshot and enter the snapshot name clean. Leave the other options unchanged and create the snapshot. Confirm that the snapshot is now available in the Snapshots tab.
If you accidentally do something to break an instance, or wish to revert recent changes to it, you can restore a previous state through a snapshot. To see how this works, let’s deliberately break the first container by deleting the bash command from it.
Go to the Terminal tab and break the container:
rm /usr/bin/bash
Refresh the page, and you’ll see the following error:

The UI cannot open a terminal for your container anymore, because you deleted the bash command. Luckily, we have a snapshot we can use to restore the container to a previous state.
Return to the Snapshots tab. From there, restore the container to the state of the clean snapshot by clicking the Restore snapshot button () next to it.
Confirm that the container was reverted to its previous unbroken state by returning to the Terminal tab. The terminal should now load.
When you no longer need a snapshot, you can delete it. In the Snapshots tab, delete the snapshot by clicking the Delete snapshot button () next to it.
To learn more about instance snapshots, see: Use snapshots for instance backup.
Optional: Stop and delete all instances
Congratulations! You have reached the end of this tutorial and acquired a greater understanding of LXD’s usage and capabilities along the way.
If you wish, you can clean up the instances you created.
Take caution when deleting instances
Deleting an instance is irreversible. All snapshots and other information associated with the instance will be lost.
You must first stop an instance before you can delete it:
lxc stop ubuntu-vm
lxc delete ubuntu-vm
You can also use the --force flag to delete an instance without stopping it:
lxc delete ubuntu-desktop --force
In the same way, you can delete the other instances that you created in this tutorial (first and second).
Click the checkbox to the left of each instance you want to delete. Use the buttons that appear at the top of the page to first stop then delete all checked instances.
Optional: Hold snap updates
By default, snaps update automatically when a new release is published to their channel. In production environments, we strongly recommend that you disable automatic updates for the LXD snap and apply them manually. This approach allows you to schedule maintenance windows and avoid unplanned downtime.
To hold updates for the LXD snap indefinitely, run on your host machine:
sudo snap refresh --hold lxd
Once updates are on hold, manually update LXD regularly to benefit from security and bug fixes.
If you do not intend to run a production deployment of LXD, you might not need this. To remove the hold and restore automatic updates, run:
sudo snap refresh --unhold lxd
For more information on managing the LXD snap and its updates, see: How to manage the LXD snap.
Next steps
Now that you’ve completed your first steps with LXD, you have a general idea of how LXD works. Next, read up on important concepts in the Explanation section and check out more advanced use cases in our How-to guides. You can also find a wealth of information in the Reference section, including the Main API specification.