
Cache Allocation Technology
In the second step, assume a system architecture where workloads with varying Quality of Service (QoS) requirements are consolidated on a single processor. This includes best-effort workloads, such as User Interface (UI) or Artificial Intelligence (AI) tasks, as well as real-time workloads, like the real-time test application. In such designs, shared resources like cache can become potential sources of contention.
Let’s take a look at how Intel® Cache Allocation Technology (CAT) can help mitigate these sources of contention. CAT provides the ability to partition caches at various levels in the caching hierarchy. For example, consider the cache architecture of the Intel® Core™ i5-1350PE processor illustrated below. Initially, the default cache configuration is used, where all cache ways are shared. In the second step, the statistics are compared with the Last Level Cache (LLC) partitioned to provide an exclusive portion of the cache to the real-time test application. In both scenarios, a memory-centric workload on the best-effort cores is simulated using stress-ng.

Cache partitioning system setup
Run experiment
Start the real-time application if it is not already running, and output the statistics to the Grafana dashboard.
sudo ./rt_linux_tutorial -i 1000 -s 1
In a second terminal start stress-ng with a memory-centric stressor.
stress-ng --vm 8 --vm-bytes 128M --fork 4
Options:
--vm 8: This parameter specifies that 8 virtual memory stressor instances should be started. Each instance will allocate and stress test memory.--vm-bytes 128M: This parameter specifies the amount of memory each virtual memory stressor instance should allocate. In this case, each of the 8 instances will allocate 128 megabytes of memory.--fork 4: This parameter specifies that 4 child processes should be forked. Each child process will execute the stress test independently.
Partition the Last Level Cache (LLC) and assign an exclusive portion of the cache to the real-time test application, as demonstrated for the Intel® Core™ i5-1350PE above. Here is how the LLC can be partitioned using the Linux
msr-tools:#define LLC Core Masks wrmsr 0xc90 0x30 # best effort mask wrmsr 0xc91 0xFC # real-time mask #define LLC GT Mask wrmsr 0x18b0 0x80 # iGPU mask #assign the masks to the cores. #This has to match with the core selected for the rt app wrmsr -a 0xc8f 0x0 # assign all cores to the CLOS0 wrmsr -p 3 0xc8f 0x100000000 # assign real-time core to CLOS1 #There is also the pqos Linux command-line utility which is part of the intel-cmt-cat package which can be used.
Note
Alternatively, you can use the script with the
rt_optimizedoption to partition the cache as demonstrated above, or with thedefaultoption for flat partitioning.sudo ./setCacheAllocation.sh rt_optimized
The script and the masks defined above are examples tailored for the cache topology of the Intel® Core™ i5-1350PE processor and the specific use-case. You may need to adapt them to match the cache topology of your processor and use-case.
Results
Cache partitioning results
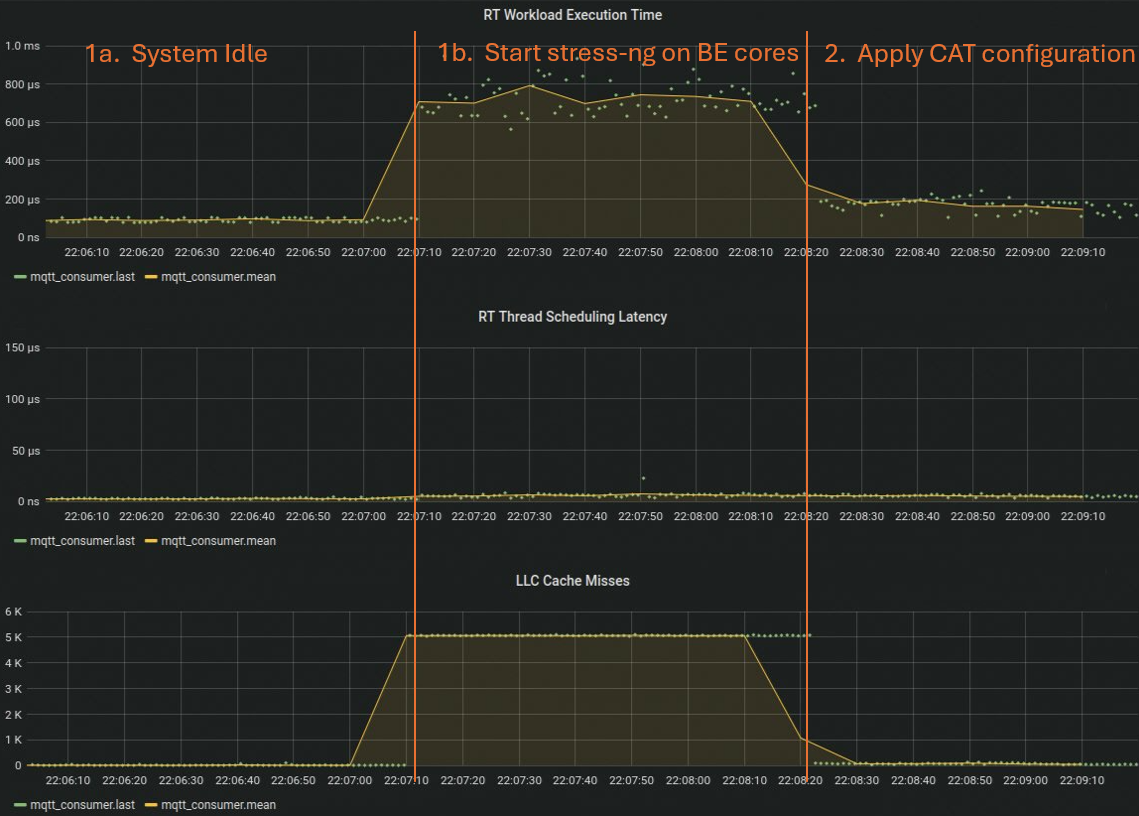
Examining the performance metrics of the real-time application shows that, in the initial phase, the cores running the best-effort workloads are mostly idling. During this phase, the execution time is very consistent and within a reasonable range. However, when stress-ng starts, both the execution time and the number of LLC misses increase significantly as you can see in step 2. This occurs because the data of the real-time application is frequently evicted from the LLC and must be fetched from the main memory. As demonstrated in the third step of the experiment, applying cache partitioning helps reduce the LLC misses for the real-time application, bringing the execution time back to a reasonable range.
As demonstrated, partitioning the cache using Intel® Cache Allocation Technology (CAT) is a straightforward way to improve temporal isolation between real-time and best-effort workloads.
This is just an example, and the configuration needs to be adjusted to your specific use case and processor.
You can determine the cache topology, including the size and number of ways supported for a particular processor, by using the CPUID leaf “Deterministic Cache Parameters Leaf - 0x4”.
Additionally, Linux utilities like lstopo are very useful for getting an overview of the cache topology of a processor.